
Did you know that a single typo on your account details can stall your entire business phone number port for days or even weeks? Smoothly moving your phone numbers between providers is key for keeping your business running and reachable. This guide breaks down every step with practical tips so you can avoid common mistakes and ensure your communications never miss a beat.
Quick Summary
| Key Point | Explanation |
|---|---|
| 1. Gather Accurate Documentation | Collect recent phone bills and account credentials to avoid delays in the porting process. |
| 2. Submit a Detailed Authorization Letter | Ensure your Letter of Authorization includes all necessary details and matches the current account holder’s information. |
| 3. Verify Ownership Precisely | Match names and details on all documents to confirm your right to transfer numbers and prevent rejections. |
| 4. Conduct Thorough Testing | Test all functionalities of ported numbers to ensure they operate correctly in the new system. |
| 5. Maintain Communication Continuity | Keep both old and new services active during the transition to avoid disruption in business communications. |
Table of Contents
- Step 1: Assess Current Phone Service And Gather Credentials
- Step 2: Submit A Porting Request With Required Documentation
- Step 3: Verify Ownership And Authorize The Port
- Step 4: Configure New System And Test Ported Numbers
- Step 5: Confirm Completion And Ensure Service Continuity
Step 1: Assess Current Phone Service and Gather Credentials
Before you can successfully port your business phone numbers, you’ll need to collect critical account information from your existing phone service provider. This preparation stage ensures a smooth transition and prevents potential delays in number transfer.
Start by retrieving your most recent phone bill from the last 30 days. According to phone.com, this document must clearly show your name, billing address, and the specific numbers you want to port. For wireless numbers, you will need two key pieces of information: your account number and a port-out PIN. If you have landline services, you might need different account credentials.
Pay special attention to the Billing Telephone Number (BTN) on your account. As Microsoft’s transfer guidelines emphasize, this number must exactly match what your current provider has on file. Any discrepancy could trigger an automatic rejection of your port request.
Pro Tip: Double-check every detail before submission. A single mismatched character can stall your entire number porting process.
Gather these documents and information systematically:
- Current phone bill (within last 30 days)
- Account number
- Port-out PIN or account credentials
- Billing Telephone Number (BTN)
- List of phone numbers to be ported
Once you have these documents ready, you are prepared to move forward with the number porting process. The next step will involve contacting your new phone service provider to initiate the transfer.
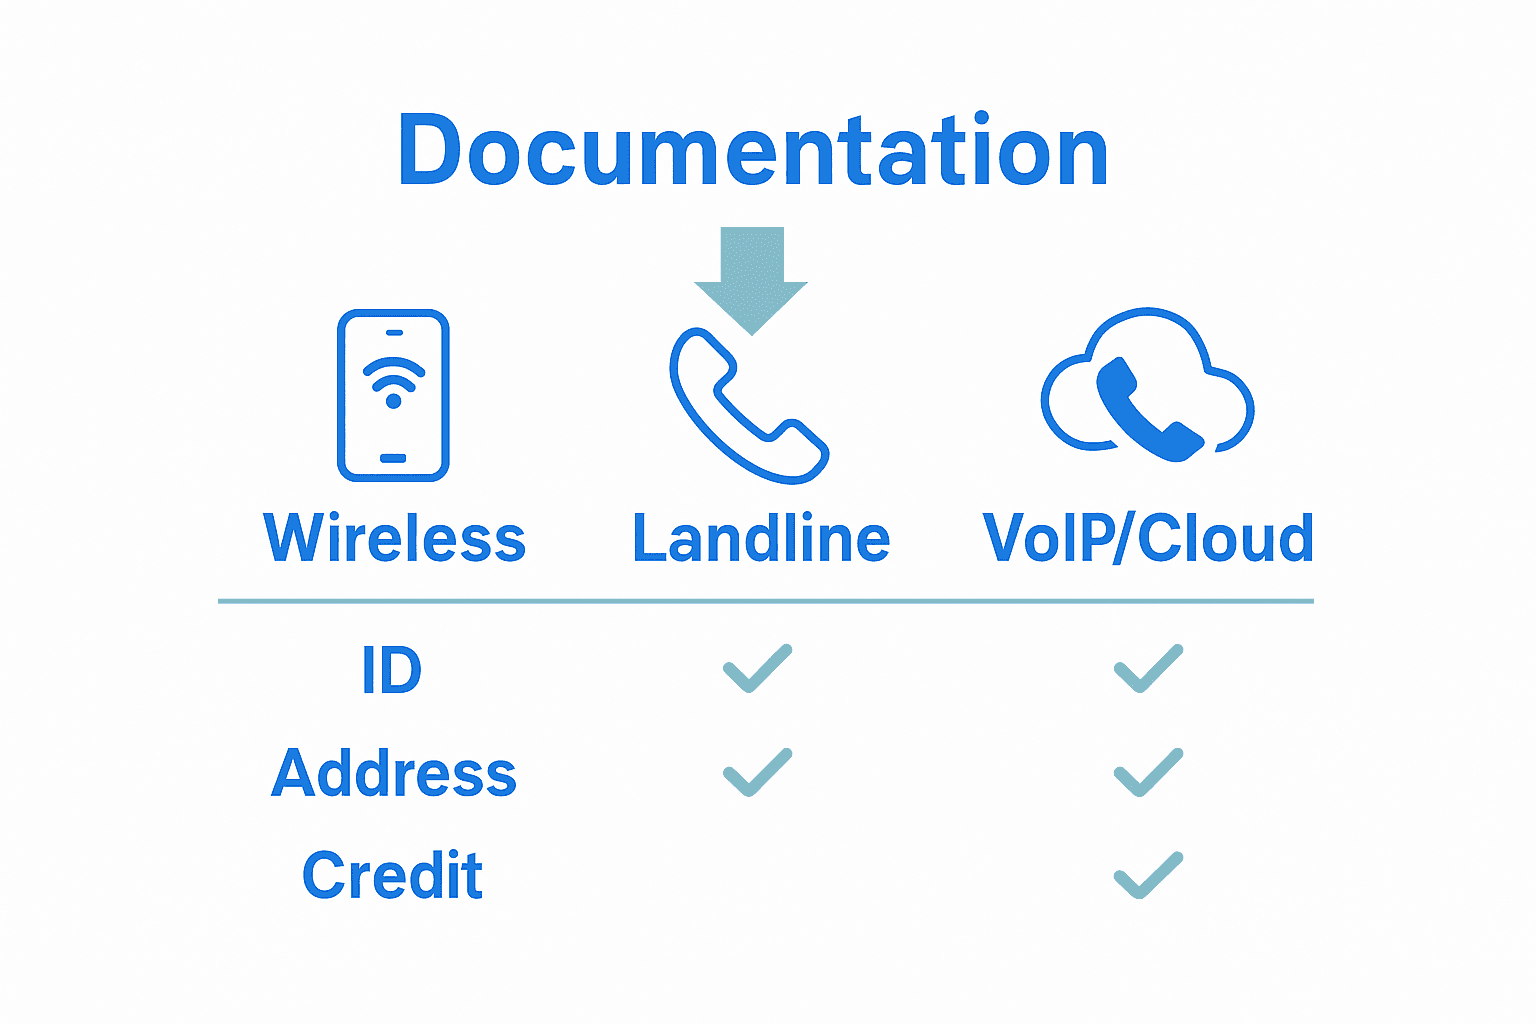
Here’s a quick comparison of required documentation by phone service type:
| Phone Service Type | Required Credentials | Unique Requirements |
|---|---|---|
| Wireless | Account number Port-out PIN |
Port-out PIN usually needed Recent phone bill |
| Landline | Account number BTN Account credentials |
Billing Telephone Number (BTN) must match records |
| VoIP/Cloud | Account number Credentials Recent bill |
Check for service-specific forms or credentials |
 |
|
Step 2: Submit a Porting Request With Required Documentation
With your account information gathered, you are now ready to submit the official porting request to your new telecommunications provider. This critical step transforms your preparation into actual number migration.
The centerpiece of your submission will be the Letter of Authorization (LOA). According to AWS documentation, this document must comprehensively detail your porting requirements. You will need to include specific information such as the numbers being ported, your current carrier’s complete business name and contact information, and your company’s precise details.
Pay close attention to the signature requirements. VoIP Review notes that most providers require a wet signature (hand-signed document) that has been dated within the last 15 days. Ensure your signature matches the name on the Customer Service Record to prevent potential delays.
Pro Tip: Create a digital scan or high-quality copy of your signed LOA for your records before submission.
When you submit the signed LOA, your new carrier will initiate the verification process. They will review the documentation and respond with one of three outcomes: a firm order commitment, a notification of potential issues (jeopardy status), or a cancellation if the porting cannot be completed.
The documentation you provide serves as the official request to transfer your business phone numbers. Accuracy and completeness are paramount to ensuring a smooth transition.
After submission, prepare to wait for your new provider’s response. They will typically contact you within a few business days to confirm the next steps in your number porting process.

Step 3: Verify Ownership and Authorize the Port
With your documentation prepared, you now enter the critical verification phase where you must definitively prove your right to port the phone numbers. This stage ensures the security and legitimacy of the number transfer process.
According to Microsoft Teams documentation, you have two primary methods to authorize the port. You can choose an electronic authorization process where an approval link is sent directly to an authorized user or opt for an offline method that involves downloading documents, manually signing them, and then uploading the signed authorization.
The key document in this process remains your Letter of Authorization (LOA). AWS Connect guidelines emphasize that this document must include a manually signed (wet signature) authorization along with supporting documentation like your Customer Service Record or most recent phone bill. These documents serve as concrete proof of your ownership and right to transfer the numbers.
Pro Tip: Ensure the person signing the LOA is officially authorized to make telecommunications decisions for your business.
When completing the verification, match every detail precisely. The name on your authorization documents should exactly match the account holder information with your current provider. Any slight discrepancy could trigger a rejection and delay your porting process.
Your new telecommunications provider will carefully review these documents to confirm you have the legal right to port the specified phone numbers. This verification protects both your business and the telecommunications infrastructure from unauthorized number transfers.
Once your ownership is verified and the port is authorized, you will move to the final stages of number migration. Prepare for your new provider to provide a timeline and next steps for completing the number transfer.
Step 4: Configure New System and Test Ported Numbers
Now that your numbers are approved for porting, you are entering the final configuration phase. This critical stage ensures your business communication infrastructure remains seamless and fully operational during the transition.
Telnyx technical guidelines explain that after port approval, your phone numbers will propagate through specialized signaling systems like SS7 or IP networks. During this transition, your new provider will likely recommend running comprehensive system tests to validate the successful transfer and routing of your numbers.
According to Phone.com’s porting guide, many providers will issue temporary numbers to maintain your business’s communication capabilities during the porting process. This ensures you remain reachable while the technical migration occurs.
Pro Tip: Schedule your number testing during off peak hours to minimize potential service interruptions.
When testing your newly ported numbers, be thorough. Verify functionality across multiple communication channels:
- Voice call routing
- Incoming and outgoing call capabilities
- SMS message transmission
- Interactive Voice Response (IVR) systems
- Voicemail setup and message retrieval
Each test helps confirm that your number has been correctly transferred and configured in the new telecommunications system. Pay special attention to call quality, routing accuracy, and any potential delays in connection.
As you complete these tests, document any irregularities or issues you encounter. This information will be valuable if you need to work with your new provider to resolve any remaining configuration challenges.
Step 5: Confirm Completion and Ensure Service Continuity
You have now reached the final stage of your business phone number migration. This crucial phase involves verifying the complete transfer and maintaining uninterrupted communication services for your organization.
Phone.com’s porting guidelines indicate that number porting timelines can vary significantly. Standard business number transfers typically complete within 15 business days. However, if you are moving multiple lines or transferring toll-free numbers, the process might extend up to 60 days.
During this transition period, it is critical to maintain your existing service contract. You remain responsible for your previous phone service until the porting process is fully complete. This ensures your business maintains communication capabilities without interruption.
Pro Tip: Keep both your old and new service contracts active during the transition to prevent any potential communication gaps.
To confirm the successful completion of your number port, take these specific actions:
- Verify all ported numbers are functioning correctly
- Test inbound and outbound calling capabilities
- Confirm accurate caller ID information
- Validate voicemail and call routing systems
- Review billing statements from both your old and new providers
Maintain open communication with your new telecommunications provider. Request a formal confirmation of the completed port and document all correspondence. This documentation will be valuable if any future disputes or clarifications are needed.
Once you have thoroughly verified the port and ensured all systems are operational, you can formally terminate your previous service contract. Remember to request a final bill and retain it for your financial records.
Ready for Hassle-Free and Secure Business Number Porting?
Moving your business numbers can feel risky and complicated when your operations rely on phones every day. Fear of downtime, the challenge of gathering exact credentials, and concerns about potential missteps during porting can create real anxiety. You want a provider who makes sure every step—gathering bills, authorizations, and testing—just works, so nothing gets lost and your team stays connected.

Experience the difference with Voipcom. We are specialists in cloud-based phone systems and number porting for small and mid-sized businesses. Our experts will personally take care of every detail for you. We will manage the paperwork, ensure your credentials are correct, and keep both your old and new services humming smoothly during the transition. We offer all-inclusive pricing with no porting fees, local support, and fully managed onboarding. Let us help you upgrade with zero headaches.
Visit our Voipcom homepage to get started or contact our team for a personalized consultation today. Say goodbye to the stress of old phone systems and discover how easy, secure, and affordable business phone number porting can be. Act now to keep your lines open and your business moving forward.
Frequently Asked Questions
What steps should I take to prepare for porting my business phone numbers?
To prepare for porting your business phone numbers, gather essential account information from your existing provider, including a recent phone bill, your account number, and a port-out PIN if applicable. Start by retrieving these documents systematically to ensure a smooth transition.
How can I submit a porting request for my business phone numbers?
You can submit a porting request by preparing a Letter of Authorization (LOA) that details your porting requirements and includes your current carrier’s information. Make sure to sign the LOA and submit it to your new telecommunications provider to initiate the number transfer process.
What is the verification process for authorizing a phone number port?
The verification process involves proving your ownership of the phone numbers through your signed Letter of Authorization and possibly other documentation, such as your recent phone bill. Follow the specific instructions provided by your new provider to confirm your right to port the numbers.
How do I test my ported business phone numbers for functionality?
After your numbers are ported, perform thorough tests across various communication channels, including voice call routing and SMS functionality. Schedule these tests during off-peak hours for minimal disruption while verifying that all features are working correctly.
How can I confirm the completion of my business number porting?
You can confirm the completion of your number port by testing all inbound and outbound services to ensure they function correctly. Additionally, maintain open communication with your new provider to obtain a formal confirmation and verify that all systems are operational.
What should I do if my porting request is rejected?
If your porting request is rejected, check for discrepancies in the information submitted, such as the Billing Telephone Number or your signature on the LOA. Correct any errors and resubmit your request to avoid further delays in the porting process.